How to Connect a 3.5″ SATA Hard Drive Externally: A Step-by-Step Guide
Are you looking to connect your 3.5″ SATA hard drive externally? Whether you’re trying to recover important data, expand your storage, or repurpose an old internal hard drive, this guide will show you the easiest and most efficient way to do it.
 In today’s digital world, external hard drives have become a necessity for storing large amounts of data. But what if you have a 3.5″ SATA drive lying around, and you need to make it externally accessible? Connecting a 3.5″ SATA drive externally can help you back up data, transfer files, or simply reuse an older drive for additional storage.

In today’s digital world, external hard drives have become a necessity for storing large amounts of data. But what if you have a 3.5″ SATA drive lying around, and you need to make it externally accessible? Connecting a 3.5″ SATA drive externally can help you back up data, transfer files, or simply reuse an older drive for additional storage.
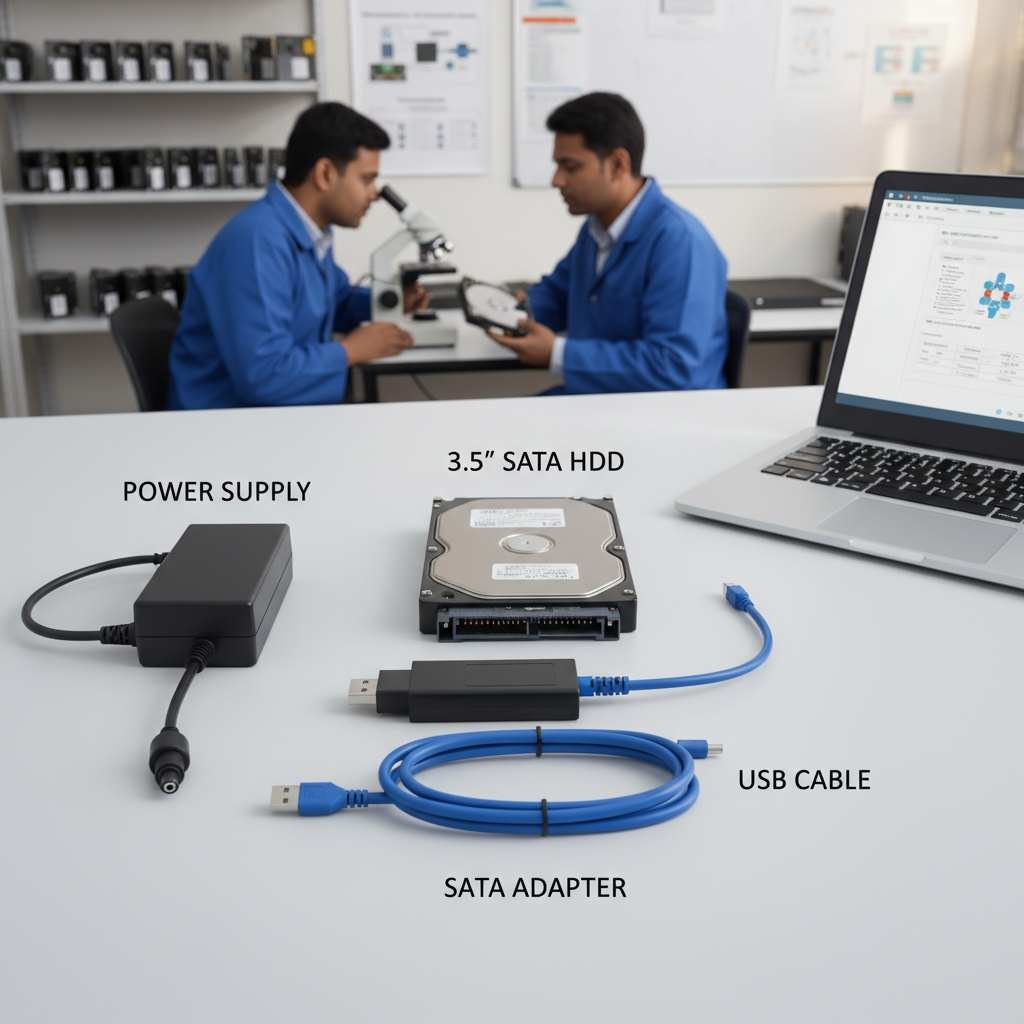
🧰 What You Need to Connect a 3.5″ SATA Drive Externally
Before diving into the actual connection process, let’s make sure you have the right equipment. The following items are required to connect a 3.5″ SATA hard drive externally:
🔌 1. SATA to USB Adapter or Enclosure with Power Adapter
🔹 SATA to USB Adapter: This is a compact and portable solution. It allows you to connect your 3.5″ SATA drive to your computer via a USB port. While a simple option for short-term use, this requires an additional power adapter to ensure proper functionality. 🔹 SATA to USB Enclosure with Power Adapter: If you prefer a more permanent and protective setup, consider a SATA to USB enclosure. These enclosures are specifically designed to house 3.5″ SATA drives and often come with an integrated power adapter. The power supply is necessary because 3.5″ hard drives require more power than can be provided by a USB port alone.⚡ 2. Power Supply for 3.5″ Drives
🔹 Unlike 2.5″ hard drives, which can draw power directly from the USB port, a 3.5″ SATA drive requires its own power supply. Most 3.5″ SATA to USB adapters and enclosures come with a separate power cable that plugs into a wall outlet or a power bank.🔗 3. USB Cable
🔹 If you are using a SATA to USB adapter, you’ll also need a USB cable (usually USB 3.0 or higher) to connect the drive to your PC or laptop.💻 4. PC or Laptop with Available USB Ports
🔹 Make sure your PC or laptop has an available USB 3.0 or USB 3.1 port to ensure faster data transfer speeds, especially if you’re working with large files.🛠️ Step-by-Step Guide to Connect a 3.5″ SATA Hard Drive Externally
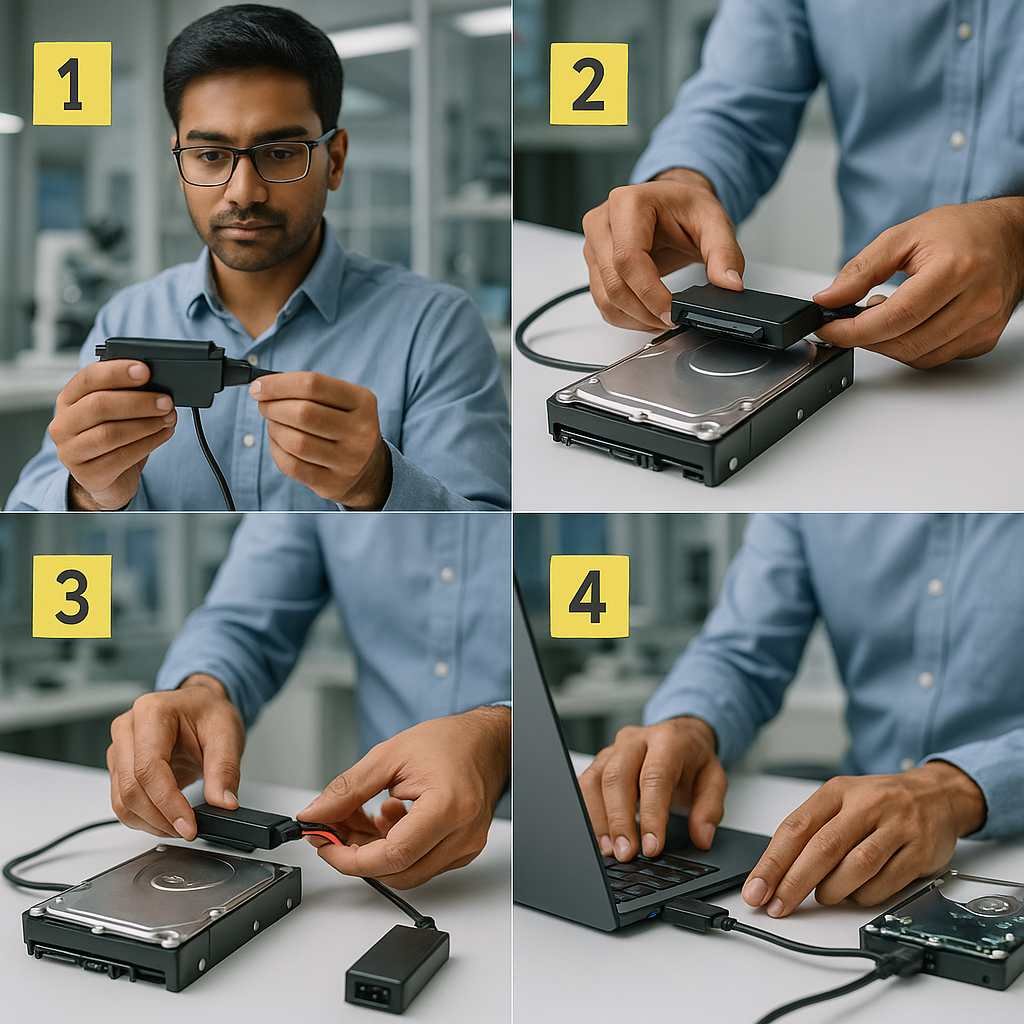
Now that you have the right equipment, let’s walk through the steps to connect your 3.5″ SATA drive externally.✅ Step 1: Choose Your Connection Method
🔹 Decide if you want to use a SATA to USB adapter or a SATA to USB enclosure with power adapter. 🔹 For something temporary and quick, choose the adapter. 🔹 For a permanent and safer solution, go with an enclosure.🔩 Step 2: Insert the 3.5″ SATA Drive into the Adapter/Enclosure
If you’re using a SATA to USB adapter: 🔹 Insert the SATA end of the adapter into the data port of the 3.5″ SATA drive. 🔹 Connect the power supply from the adapter to the SATA drive. If you’re using a SATA to USB enclosure with power adapter: 🔹 Slide the 3.5″ SATA drive into the enclosure, aligning the connectors. 🔹 Secure the drive by closing the enclosure. 🔹 Connect the power supply to the enclosure and plug it in.🔌 Step 3: Plug in the Power Supply
🔹 Connect the power cable to the adapter or enclosure. 🔹 Plug it into a wall outlet or a power source.🔗 Step 4: Connect the USB Cable
🔹 Use the provided USB cable to connect the drive to your computer. 🔹 For best performance, use a USB 3.0 or USB 3.1 port.🟢 Step 5: Power on the Drive
🔹 Turn on the power supply (if there’s a switch), or wait for your system to detect the drive.💾 Step 6: Format the Drive (If Necessary)
For Windows:
🔹 Open Disk Management (Right-click on This PC > Manage > Disk Management). 🔹 Locate your external drive. 🔹 Right-click and select Initialize Disk. 🔹 Format the drive using NTFS or exFAT.For macOS:
🔹 Open Disk Utility (Applications > Utilities > Disk Utility). 🔹 Select your drive. 🔹 Click Erase and choose a format (Mac OS Extended, exFAT, or APFS).📂 Step 7: Access Your Data
🔹 Once the drive is formatted, it will mount on your system. 🔹 You can now transfer files, back up data, or use it for storage.When External Connection Fails
When connecting externally doesn’t work — and what to do next: If your 3.5″ SATA drive powers on when connected externally but is not detected, shows as RAW, or produces clicking sounds, do not unplug and re-plug repeatedly. Each power cycle on a failing drive risks further mechanical damage. A drive that is not recognised by the external enclosure but was previously functional may have firmware corruption, bad sectors on the boot sector, or a failing PCB — all repairable in a professional lab setting. Data Engineers provides free diagnosis even for externally-connected drives.💡 Tips for Using Your 3.5″ SATA External Drive
❄️ 1. Keep Your Drive Cool
🔹 3.5″ drives can generate heat—use a cooling fan or ventilated enclosure for long usage.🔁 2. Regular Backups
🔹 Always back up important files to another drive or the cloud.⏏️ 3. Safely Eject the Drive
🔹 Always eject the drive safely from your OS before unplugging to avoid data loss.🧾 Conclusion: Why Use a 3.5″ SATA Drive Externally?
Connecting a 3.5″ SATA drive externally is a great way to repurpose old hardware and gain more storage. 🔹 Recover data from old drives 🔹 Expand your computer’s storage 🔹 Back up important files 🔹 Use it across multiple devices With a reliable SATA to USB adapter or enclosure with power adapter, you can set up your external drive easily and efficiently.📞 Contact Information
If you need more assistance or want to inquire about our products and services, feel free to reach out: 📍 Location: 704, Meghdoot Building-94 Nehru Place, New Delhi 📞 Phone Numbers: +91-11-26426316 +91-991-013-2719 +91-981-856-7981 📧 Email Address: support@dataengineers.in
Worldwide Leader in Data Recovery

Leave a Comment